Mushrooms are as fascinating as they are tasty. The largest living organism on Earth is a honey fungus mushroom in Oregon, USA, covering over 2,385 acres and is estimated to be around 2,400 years old.
Although a single mushroom is small in size, they connect together to form large mycelium networks, sometimes referred to as the “Wood Wide Web”, connecting plants by allowing them to communicate and share resources.
I could write an entire encyclopedia on the wonders of mushrooms, but let’s get down to what you all came here for – how to grow mushrooms at home. Unlike other homegrown staples, such as fruits and vegetables, mushrooms are very fast-growing (they double in size every day) and do not require perfect soil or large upfront expenses.
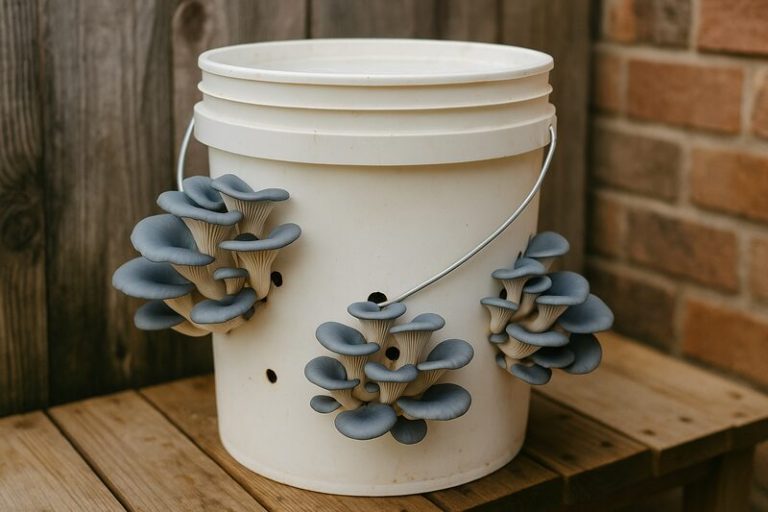
As this article will demonstrate, all you need to grow various types of mushrooms at home are a bucket, a growing medium, and some mushroom spawn. Using the “bucket tek”, we will utilize the most reliable methods to grow many mushroom varieties quickly and reliably, enabling you to incorporate the wonders of mushrooms into your daily life.
How To Grow Mushrooms At Home

What You’ll Need
Before we start, you’ll need to source the following items (more information on each will follow below).
- Bucket with lid (5-gallon works best)
- Drill with ½ inch drill bit (¼-inch will also work)
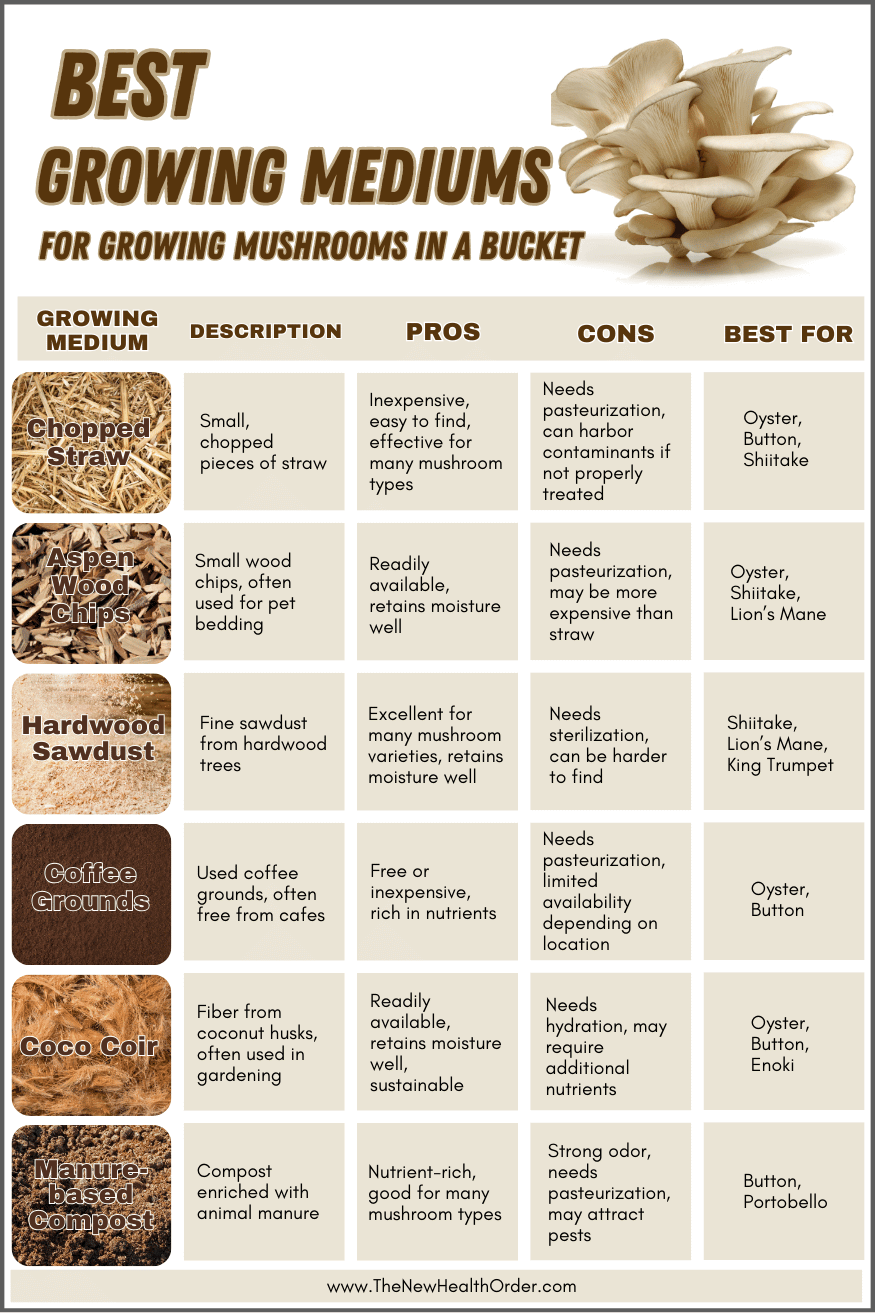
- Growing Medium (This article will use Aspen wood chips)
- Mushroom Spawn (or spores)
- Spray bottle of water
Step 1 – Choose Your Mushroom Type
Mushrooms might all seem the same, but they vary as wildly in taste and texture as they do variety.
If this is your first time growing mushrooms at home, I recommend one (or all) of the easiest and most common types, providing a tasty and nutritious source of mushrooms that are easy to grow at home.

Step 2 – Prepare the Bucket
The size of the bucket you use depends on how many mushrooms you wish to grow, but I recommend starting with one 5-gallon bucket as it is large enough to get a good number of mushrooms but small enough to grow relatively quickly and easily.
Before growing anything in the bucket, we need to drill some holes all around and underneath to ensure proper air circulation and drainage, while also providing space for the mushrooms to grow.
Drill 1/2-inch holes around the side and bottom of the bucket, spaced between 4 and 6 inches apart. Don’t worry about perfect spacing, but try to drill the holes fairly uniformly. ½-inch may seem small, but it is more than enough for mushrooms to fruit out of. I have also seen people use ¼-inch holes successfully. Holes larger than ½-inch, however, risk drying out the substrate.
Also, drill some 1/4-inch holes in the bottom to allow any excess water to drain away.
Remove any plastic shards that result from drilling, and thoroughly clean the bucket with soap and water to remove any contaminants. I recommend sanitizing the bucket with 70% isopropyl alcohol or by dunking it in water mixed with a small amount of bleach shortly before use.
TIP: Be careful with your cleaned bucket to not contaminate it again after cleaning. Contamination is the number one cause of failed mushroom spawns.
Step 3 – Prepare the Growing Medium
With your bucket prepared, it’s time to prepare the growing medium.
There are many types of substrate, all of which can have advantages and disadvantages depending on the variety and technique used. When it comes to substrates and growing mediums, mushrooms are not picky – when the conditions are right they can, and will, grow on almost everything. Some are better than others, however.
It’s easy to get hung up and confused when picking a medium as the wealth of information can be overwhelming. As a beginner, the simplest and most effective way is to use either chopped straw or aspen wood chips, both of which are readily and relatively inexpensively sourced from pet stores or farming stores.
For this article, I’m going to use Aspen wood chips bought from Walmart, as they are tried and tested and successful for me.
TIP: Chopped straw is cheap from a pet store, but the same stuff repurposed on Amazon will cost significantly more.
Chopped straw, wood chips, and many other growing mediums need to be pasteurized – the process of heating the substrate to eliminate harmful microorganisms while preserving beneficial ones, promoting a healthy growing environment for mushrooms. Pasteurizing gives a better chance for the mushrooms to fruit, as well as making it easier for the mycelium to work its way through the substrate.
The process of pasteurization is simple; you need a tote or container large enough to contain your growing medium, fill it with hot tap water, and add a few gallons of boiling water from the stove or kettle.
This should be enough to get your temperature to around 80 degrees Celsius where the chips can pasteurize. Leave this mix to work its magic overnight.
Step 4: Inoculate the Substrate
With all the prep work done, it’s time to inoculate the substrate and begin the life-creation process.
You can buy mushroom spawn from many places, including Amazon. Alternatively, you can make your own, although I would only recommend this for more experienced mushroom growers.
The aim when inoculating the substrate is to layer the two materials (pasteurized growing medium and mushroom spawn) like a layered mushroom cake. This gives the mycelium the best chance to fully occupy the entire bucket and present a bountiful yield.
Remove the excess water from the pasteurized medium by squeezing it with your hand and creating your first layer. We want the growing medium fully moist, but not dripping wet. If they are slightly too wet, the drain holes drilled into the bottom of the bucket will help to drain some of the excess.
General advice is to aim for 1.5 to 2-inch layers of wood chips, with a handful of mushroom spawn between, adding up to around 6-8 layers. For a typical 5-gallon bucket, I tend to use around 5 lbs of grain spawn. You can use as low as 2.5 pounds of spawn per bucket, but higher spawn rates will increase the speed and reliability of colonization.
The idea here is that we want to give the mycelium the fastest and easiest way to occupy the whole medium – by spreading the spawn across multiple layers, we speed up the time to fruiting and make it more even.
Again, take care with sanitation – wash your hands and the mushroom spawn bag before using it to reduce the chances of contamination.
Try to avoid large clumps of spawn; breaking it up and increasing the surface area will increase the mycelium’s productivity.
Compact each layer lightly with your hand – any air pockets will create a block where the mycelium cannot grow. Don’t over-compact, however, as this will make it more difficult for the mycelium to propagate. Simply press lightly with your knuckles to ensure there are no large pockets of air.
When you get to the top of the bucket, you want your final layer to be woodchips. Once full, simply cover it with the lid, and the work is done.
Step 5: Incubation
With inoculation now complete, all we need to do is provide a nice environment for the mycelium to propagate and let time do the rest.
The ideal temperature and moisture conditions depend on the mushroom variety. Pink oysters need colonization temperatures above 60°F, while cold-tolerant blue oysters thrive in temperatures closer to freezing. A quick search to confirm the specific requirements for your mushroom spawn will explain the necessary conditions for your variety.
Most varieties need a cool and humid environment like a garage, out of the way of direct sunlight and wind. Oyster mushrooms are sensitive to CO2 concentrations, so it can be good for them to fruit outside where the air is fresher.
It will take around 2 weeks to fruit for most varieties, during which time the mycelium will grow and form white cotton-like growth throughout the growing medium. The substrate will eventually turn completely white with mycelium. By letting it fully colonize, you increase yields and decrease the risk of contamination.
However tempting, avoid opening the lid disturbing the growing mycelium and introducing potential contaminants. Let it colonize and do its thing for 14 days, after which you should see some fruiting.
TIP: If you see no growth or notice a strange smell, you may have a contamination problem, often caused by too much moisture, heat, or a contaminated substrate. Dead yields are a part of mushroom growing and you’ll have to start again.
Step 6: Fruiting
Fruiting is the process where mushroom mycelium develops and produces mature mushroom fruit bodies, ready for harvest. This will be evident as you’ll have mushrooms growing out of some of the holes in the bucket.
The key to successful fruiting is keeping a high humidity – as soon as mushrooms dry out they will turn black and stop growing. Wind and direct sunlight will dry out fruiting mushrooms, so when outside put them in a location away from the sun and the wind.
I keep my mushrooms outside in a shady corner on my balcony. If it turns windy, I might bring them in or move them back to the garage.
Use a water spray bottle to mist the fruit 2 or 3 times a day to ensure they stay constantly moist.
Alternatively, you can drape a plastic bin bag or cover over the top of the entire fruiting bucket to try and maintain humidity, just taking it off a few times a day to ensure it gets some fresh air.
Step 7: Harvesting
After patiently waiting for a couple of weeks, you should hopefully now have a few clusters of mushrooms doubling in size every day.
You want to harvest your mushrooms just before they curl up and drop their spores. I tend to wait until two or three of the caps have just started to turn upwards, at which point you can be fairly sure that the rest are ready to do so.
To harvest, use a knife to cut the mushroom cluster at the face of the bucket where the cluster emerged from. You’ll be amazed at how large a mushroom cluster can grow from a ½-inch hole!
After harvesting, you have a few options. You can either leave the substrate and wait for it to get a second flush (you will get a decent second round, although it won’t be nearly as fruitful) or discard the contents and start a new batch for better production.
I tend to empty the contents of the bucket and leave it to grow somewhere in my garden. This way I get some mushrooms from a second fruit but can get more mushrooms growing in my bucket immediately.
Final Thoughts
Growing mushrooms at home is a rewarding and fascinating hobby, as the bucket technique is an excellent way to dip your toes into the subject.
Patience and observation are key to successful mushroom growth. Each variety has unique requirements, and by paying attention to these details, you can optimize your yields. Challenges like contamination or slower growth are part of the learning process and provide valuable lessons. Don’t be put off if one of your yields dies off – it’s a natural part of mushroom growing that everyone goes through.
Growing mushrooms at home is not only practical but also an engaging way to connect with nature. Gather your materials, follow the steps, and enjoy the fruits of your labor. Happy mushroom growing!
FAQs
Is growing mushrooms at home easy?
Unlike other homegrown staples, such as fruits and vegetables, mushrooms are very fast-growing (they double in size every day) and do not require perfect soil or large upfront expenses.
How to grow mushrooms without a kit?
All you need to grow various types of mushrooms at home are a bucket, a growing medium, and some mushroom spawn. Using the “bucket tek”, we will utilize the most reliable methods to grow many mushroom varieties quickly and reliably.
What substrate is best for mushrooms?
It’s easy to get hung up and confused when picking a medium as the wealth of information can be overwhelming. As a beginner, the simplest and most effective way is to use either chopped straw or aspen wood chips, both of which are readily and relatively inexpensively sourced from pet stores or farming stores.